Did y’all ever watch America’s Next Top Model? They’re about to return for their 90,000th season (only a slight exaggeration…) and the show follows a specific formula. The first or second episode of every season would feature the women being offered FREE(!) makeovers that included hair cuts and color and inevitably one of the women would be asked to cut her hair and as a result FREAK. OUT.
People – it’s hair. When I watched this show back in the day I’d find myself yelling at the screen and becoming a full on stereotype. These women say they want to be models and someone is offering you an awesome cut and color for FREE in order to show off your best features and you start bawling?!?

It’s just hair. It grows back. If you mess something up with your hair you can fix it or pivot to a new plan. With that caveat, let’s dive into the wonderful world of home hair care! If this post had a mantra it would be a giant flashing sign that says “It’s JUST hair!”
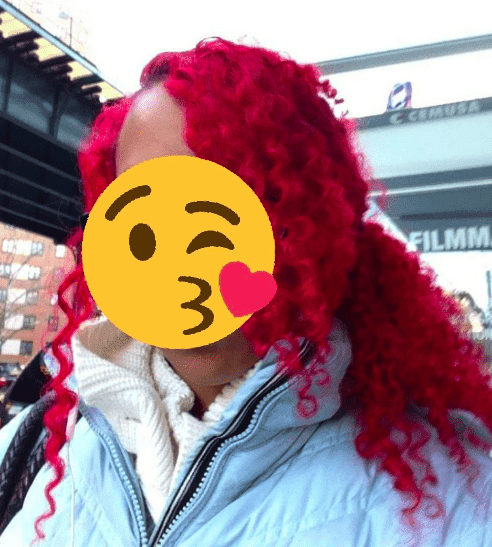
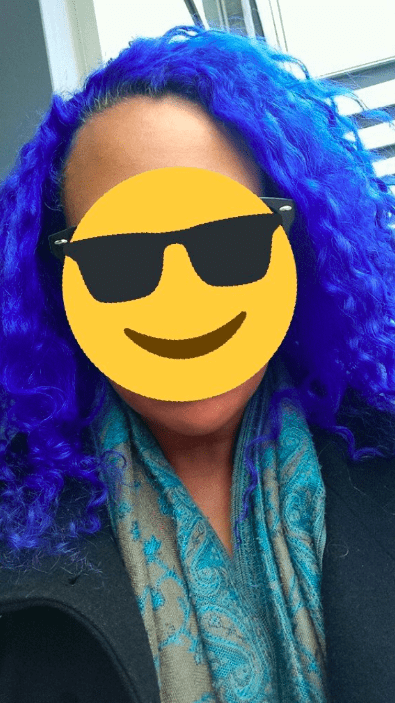
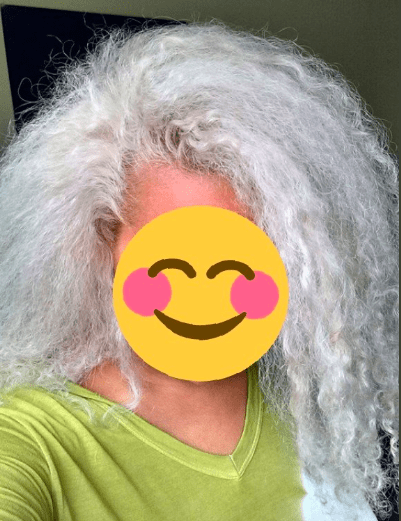
I mentioned during my interview on the FIRE Drill Podcast that my hair is not always purple (blasphemous I know!) – though that is the color I use most often because Purple speaks to me. Well it’s time to get back to my ‘roots’ (snicker) right in time for my first official personal finance event, FinCon 2019! So let’s get into how and why I do it.
Why Do I Bleach And Dye My Hair At Home?
Over the last 15 years, my hair has been bleached and dyed often – both in salons and at home. When I go to the salon, it’s great to have an expert there to walk me through something new, but that hand-holding comes at a premium. For example, my bleach and dye appointments were $300-500 plus a 20% tip.
In contrast, all of the materials I mention below were bought for about $50 and include multiple uses. This cost difference combined with my general “Fuck it – It’s hair” attitude has led me to completely pivot to only bleaching and dyeing my hair at home.
It’s like a fun science experiment and it saves a shitload of money if you get bored with your hair often like I do. If you are worried about bleaching and dyeing your hair or do not have my “It’s just hair” mindset, that’s totally fine and I would suggest you go to a professional. I have yet to mess up my hair in any way, but I go into each session knowing it’s a possibility. Obviously do what you’re most comfortable with – even if it costs more money.
SERIOUS LOOKING DISCLAIMER:
I am not a hairdresser or a beauty professional. All of this information is just based on my experience. All hair is different. If you are not open to the possibility of rocking a messed up look while figuring out how your hair reacts to chemical changes please consult a professional.
The Materials I Use
For those of you brave enough to follow me into the abyss, here’s what I use to bleach and dye my hair at home:
Bleaching Materials
- Cold-Pressed Coconut Oil: This is my super magic secret. Using coconut oil before and between bleachings helps to protect your hair from damage. It’s helped me keep my hair luscious and not like the straw it should be after the number of times I’ve put it through the ringer these last 15 years. In that time I’ve only completely cut it off and started over once – and that was just a year ago
- Developer: Developer is the liquid that you mix with bleach powder to make ‘hair bleach.’ I have very dark hair so I use 30 volume developer. If you have lighter hair I would suggest 20 volume (less strong) developer. If you’re even more wild than me 40 volume is also available if you want to go for it, but I prefer using 30 and just bleaching multiple times if my hair doesn’t become as light as I want. Ion Color Brilliance is the brand I prefer based on my massive amounts of research over the years and self-experimentation. All of their products smell surprisingly good (despite including harsh chemicals) and do not leave my hair feeling as fried as other brands
- Bleach Powder: This is straight forward and comes in 1 strength
- Aussie 3 Minute Miracle: Bleaching can take a lot out of your hair and it needs to be moisturized to stay healthy. This deep conditioner is the best I’ve found for the job. After I complete all the steps below for my bleaching, toning and dyeing session I use this deep conditioner as my regular conditioner until it runs out. It helps keep my hair luscious and avoid that fried look hair can take on with a lot of bleachings
Toning Materials
- Toner: Because I’m using a brightly colored dye and I have dark hair, I want my hair to be as close to white as possible in order to show that bright color at its most vibrant so I use Wella T18 Lightest Ash Blonde Toner to remove brassiness (aka the orange hue that comes out when you bleach dark hair)
Dyeing Materials
- Hair Dye: Today I’m using (2) 4oz containers of Manic Panic Ultraviolet paid for with my sweet Job Spotter app money. Personally I have thick and long hair so I buy at least (2) of the 4oz Manic Panic dyes to make sure I can cover my entire head. I’ll discuss what dye brands I like and why below
- Vaseline: This is to keep the dye off your skin where it comes into contact with your hair, such as your forehead, ears and neck
- After Color Treatment: This helps lock the color into your hair and is very helpful to decrease or eliminate the possibility of your hair dye ruining your clothes and pillows or running down your face when you start sweating at the gym the day after you dye your hair (and yes – all of these have happened to me. Learn from my embarrassing mistakes please!)
- Stain Remover: This is a lifesaver! I have stained many a sink, wall and door with my wild hair dye adventures. This is the only stain remover I’ve found that ACTUALLY removes tough hair dye stains from basically anything (skin included). I suspect it has made my current landlord love me and it has definitely helped me avoid looking like I lost a fight with a paint can!
General Materials
- Shower Caps: I use shower caps whenever I have something in my hair: be that bleach, toner or dye. It helps keep everything clean and allows you to go about your regular life while waiting for chemicals to do their magic. It also helps when you’re sleeping with coconut oil in your hair if you’re worried about getting it on your pillow case (I don’t usually care personally and at most put a towel over my pillowcase…)
- Mixing Bowl: Straight forward – you need somewhere to mix your concoctions!
- Mixing Brush:…and something to mix those concoctions with!
- Gloves: We’re dealing with dangerous chemicals (bleach) and/or stain-y ones (dye) so protect yo’self!
- Hair Ties: I use these to keep my hair on top of my head while I sleep with coconut oil in it or before I put it in a shower cap during bleaching or dyeing. Hair clips are another great option
- An Old Shirt: This is going to get messy – dress accordingly!
- An Old Towel: When you wash bleach and dye out of your hair your towel will turn interesting colors. You’ve been warned!
How I Bleach My Hair At Home
Common Bleaching Questions And Answers
How Do You Protect Your Hair While Bleaching?
The general advice before bleaching hair is to let your hair oils build up for a bit before slapping the chemical on there. To do this you can refrain from washing your hair for a few days before the process (if you can swing it). In addition to that I use my super secret Coconut Oil method. Putting coconut oil on your hair and letting it sit for about a day before bleaching and having it on your hair while bleaching creates a protective barrier and minimizes damage.
How Many Times Do You Need To Bleach Dark Hair?
How Long Should You Wait Between Bleaches?
This is a contentious topic. The real answer is “as long as you can.” Bleaching takes a lot out of your hair, so doing it often without giving your hair a lot of time to recover can damage it. Coconut oil helps decrease the amount of damage, but you’re still in essence stripping your hair when you bleach it.
I’ve heard of people waiting a month between bleachings if they’re super cautious or have very fine hair that will break easily. I have waited a week between bleachings at the most and sometimes just wait a day between without any adverse effects, but everyone’s hair is different so ask yourself again how wild you want to be and if you’re worried contact a professional.
The Step-By-Step Bleaching Process
Step 0. The night before you plan to bleach, apply liquid coconut oil to your hair, put on a shower cap if you’re worried about staining your pillow case and sleep on it. If your coconut oil is in a solid state when you’re about to apply it, I like to scoop some into a small bowl and microwave it so it becomes liquid and is easy to spread throughout my hair. It doesn’t take a lot of coconut oil – I use about 2 TBSPs and I have a lot of thick hair
Step 1. Put on a shirt you don’t care about that will be dubbed your “hair experiment shirt!” Then put on gloves and mix your bleach and developer per the instructions on the bottle into a mixing bowl with a mixing brush. I personally use a 1:1 ratio of 30 volume developer and bleach powder and mix 6 TBSP of each into my bowl to cover all of my thick hair
Step 2. With the coconut oil still in your hair, apply bleach to your hair! I’m bleaching my entire head so I start applying the bleach to my roots and move down to the tips of my hair. For the roots I use my mixing brush for precision, but afterwards find it easier to use my hands. Do whatever is most comfortable to you. Please note that more serious bleach enthusiasts suggest actually starting to apply bleach about an inch past your roots and then circling back at the end to apply bleach to the actual roots. Your roots bleach relatively quickly because they are new hair and the heat from your scalp speeds up the process so doing that creates a more even color, but to be honest I’m too lazy for that and I’m covering the bleached hair up with dye so any slight difference in color won’t be visible anyway
Step 3. Put on a shower cap and wait the amount of time indicated on the packaging. My package instructed me to wait a max of 50 minutes so that’s what I did (can you tell I like to flirt with danger?). Feel free to use the time to clean all of the materials you used to bleach your hair
Step 4. After the allotted time is up, rinse the bleach out of your hair in the shower with shampoo
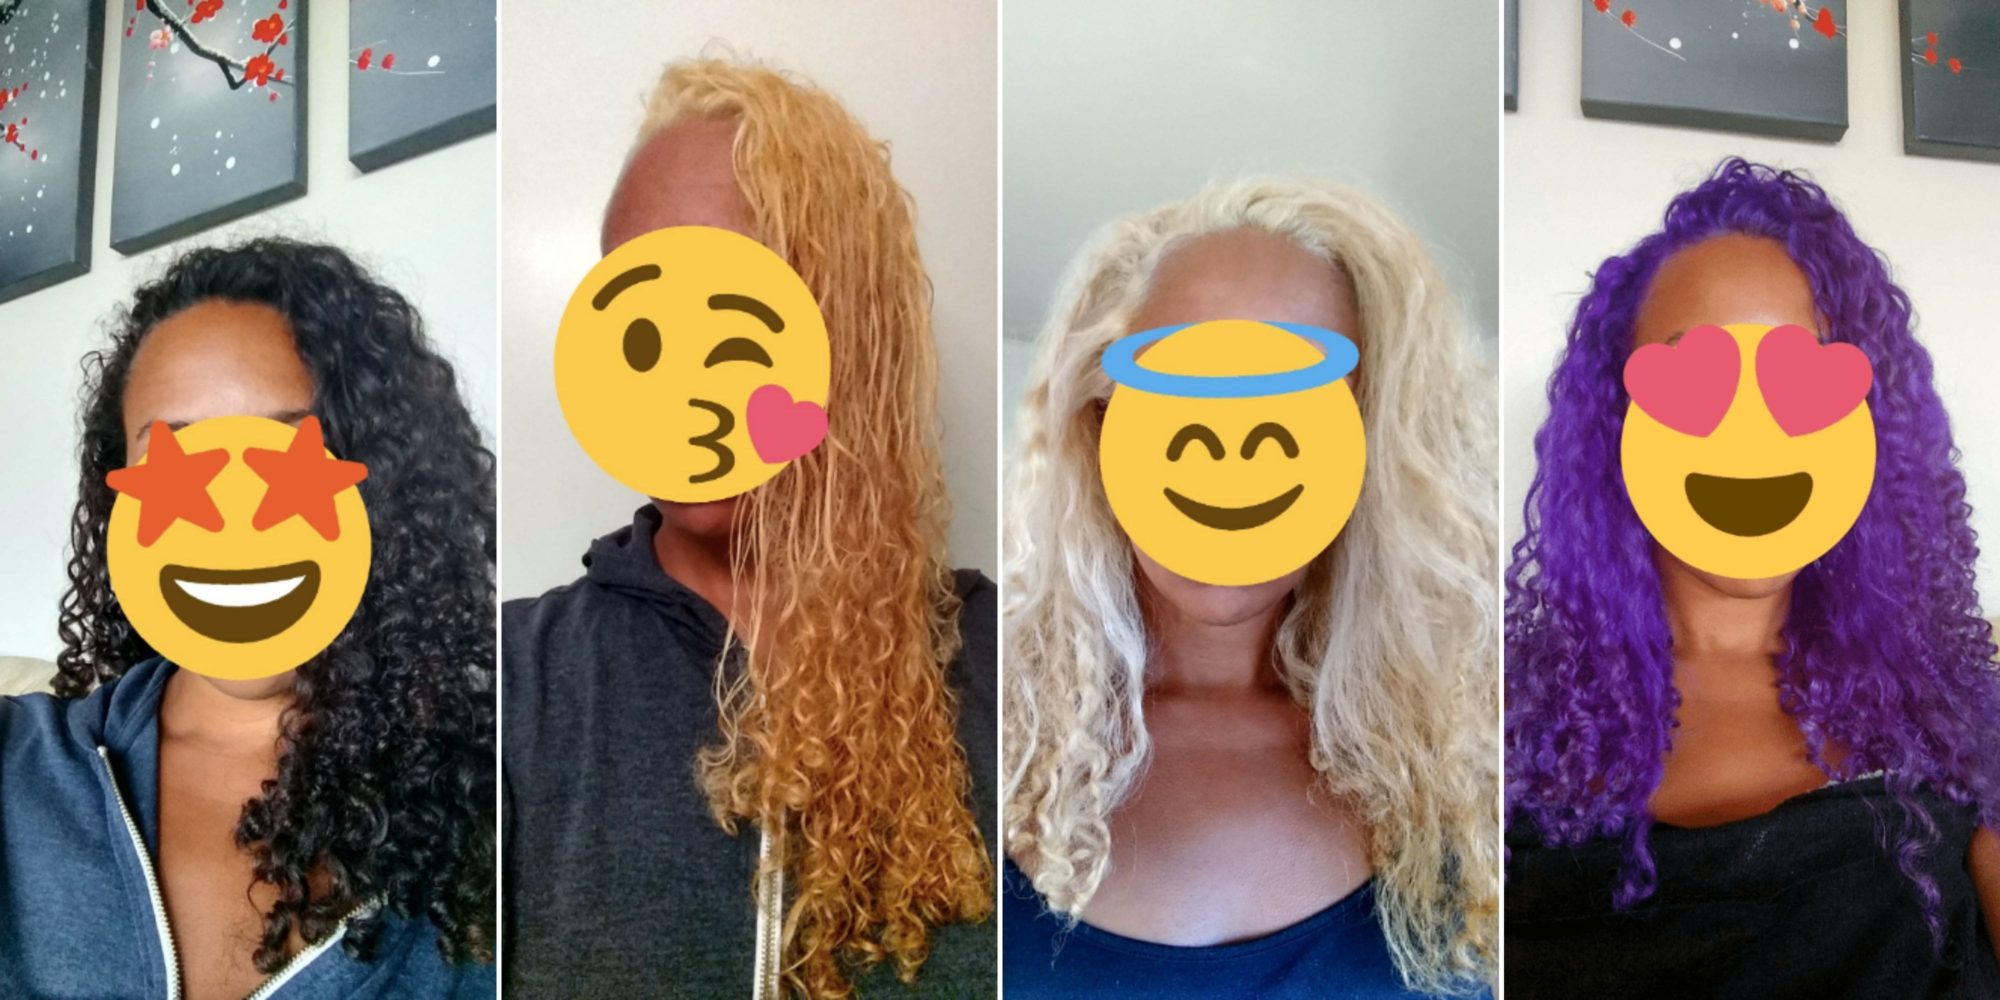
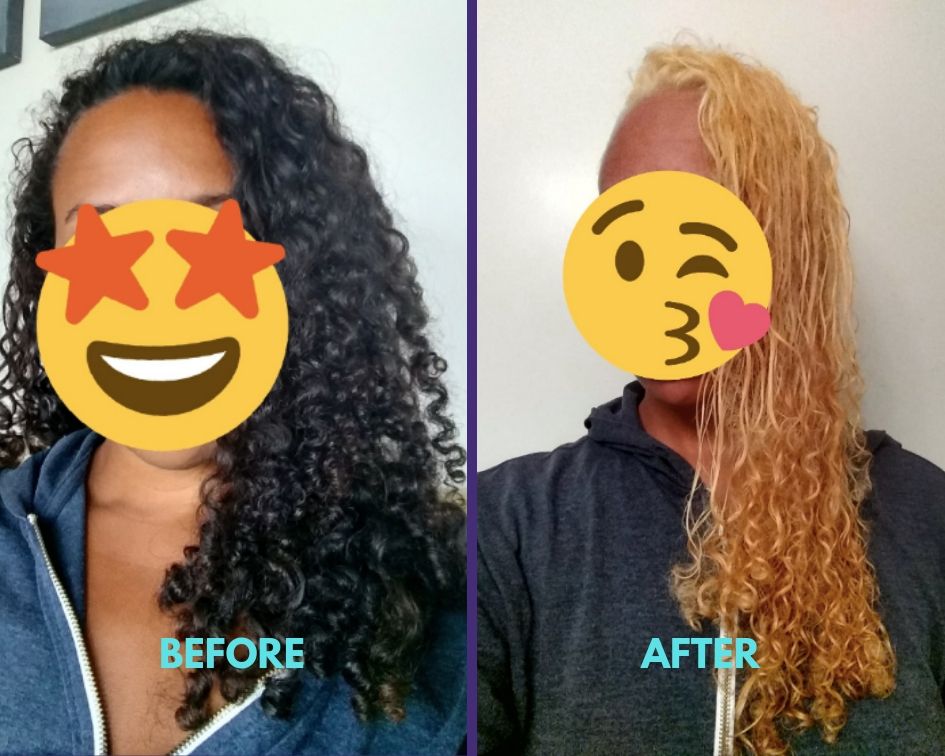
Here’s what my hair looked like before and after bleaching:
How I Tone My Hair At Home
Common Toner Questions And Answers
Do You Need To Tone Your Hair?
What Toner Do I Use?
From my research and experience, I prefer the Wella brand of toner. Their T18 Lightest Ash Blonde Toner allows me to get the whitest hair possible that provides a blank canvas for my dye. For example, this is the whitest I’ve ever gotten my hair and I only could have done it with toner:
The Toning Process
Now it’s time for toner! Toning your hair is really simple – just follow the instructions on the toner box, which usually includes mixing it with an amount of developer in your mixing bowl, applying it to your hair and waiting the time allotted on the box. Feel free to use the wait time to clean all of the materials you used to tone your hair. Easy!
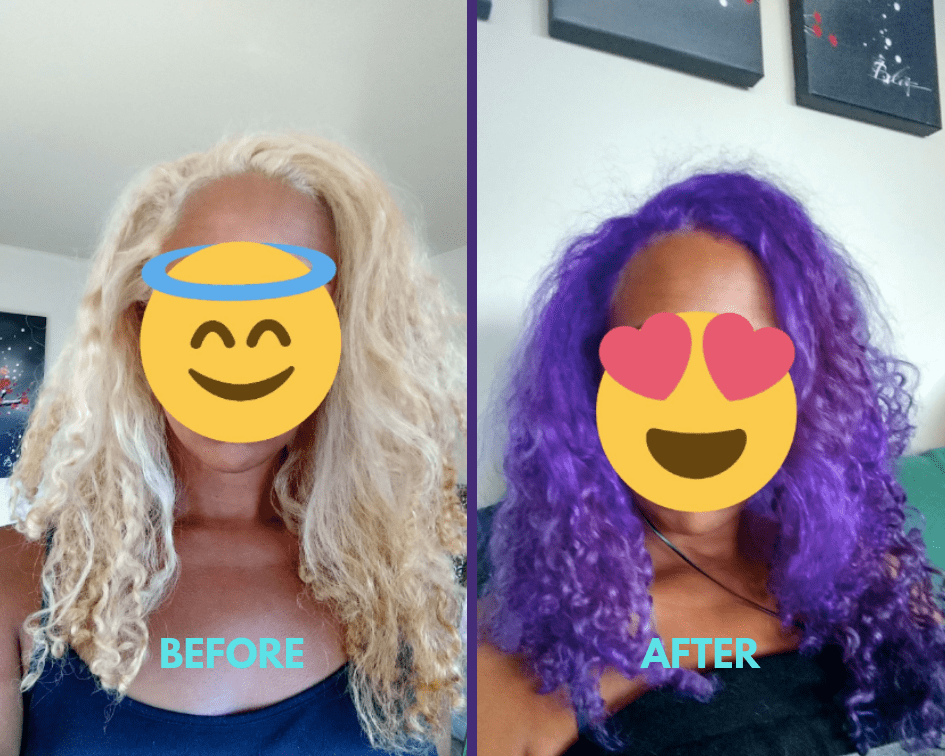
And here’s what my hair looked like before and after toning:

How I Dye My Hair At Home
What Type And Brand Of Dye Do I Use?
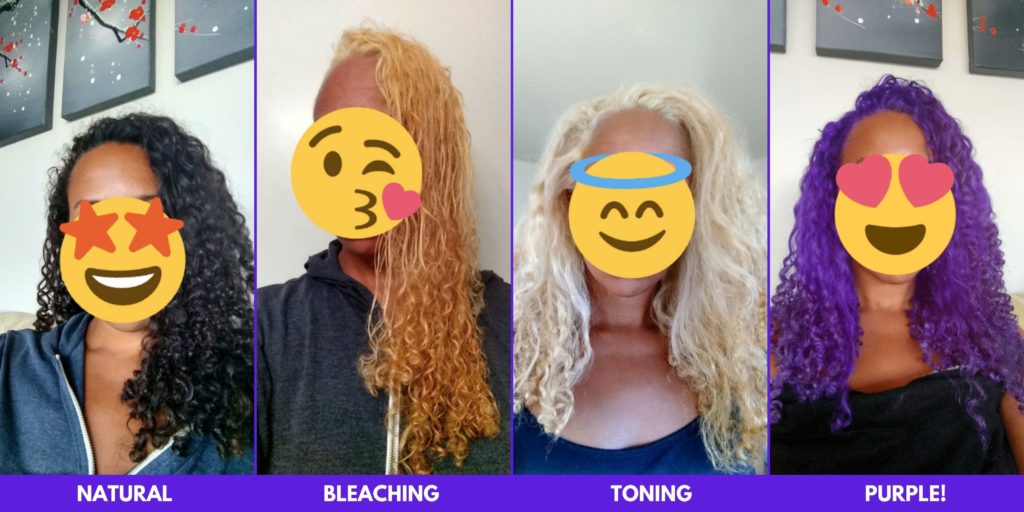
I prefer semi-permanent color (instead of less permanent wash out) because personally I want the color to stick around indefinitely. As for brands, there are two I love for very different reasons. Ion Color Brilliance has a fantastic full line of hair products and their dye has an awesome firm texture that makes it really easy to apply and not splatter everywhere, BUT their colors are more professional and less punk rock. And I’m obviously all about that Rockstar life 😉 .
To get the wild color I want, Manic Panic has been my go to and has never led me astray. The bright pop of their colors makes up for the fact that splatter is real. It can be a messy process, but that’s what Stain Remover is for!
The Step-By-Step Dyeing Process
Step 1. Put vaseline around your ears, your neckline and where your forehead meets your hairline to help protect it from the dye
Step 2. Put on your hair dyeing shirt and your gloves and then put your color of choice into your (clean) mixing bowl
Step 3. Apply the color to your hair from the roots to tip. I like to use my (gloved) hands instead of a brush to do this because once again – I’m lazy 😉 and also because it helps me work the dye into my hair more thoroughly than a brush could
Step 4. Put on a new shower cap and wait. The longer the color stays in, the stronger it is. I kept mine in 2 hours this time, but have previously gone much longer
Step 5. Put on your gloves to protect your nails from changing color and rinse your hair out with cold water in a metal sink. This tip is a lifesaver because a lot of tubs are very porous (guess how I figured that out…) so if you rinse off dye in them some tubs absorb it so the tub becomes dyed that color too. UH OH! So use a metal sink if you can and rinse with cold water for seemingly forever until the water runs clear! If you don’t have a metal sink and only have a porous tub to wash your hair in, white vinegar has been known to get dye stains out of tubs
Step 6. Then I suggest using this After Color Treatment on your hair because it locks in the color and reduces the chance of it running later and causing a mess on your towels/pillowcase/clothes/forehead at the gym tomorrow morning
Step 7. Then use Stain Remover on any skin that got stained and any parts of the bathroom or kitchen you accidentally dripped dye on (my bad…)
Post-Dyeing Tips
- Protect Pillowcases And Clothes From Wet Hair: This is for all of you wet hair sleepers! If you go to sleep with wet hair, I would recommend putting a towel you don’t love over your pillow case for the first few days after dyeing just in case there’s leakage. I personally sleep with my hair dry to avoid this issue. Also be careful with white clothes if you’re putting them on when your hair is wet during the first few days for the same reason.
- Cold Water is Queen: Wash your hair in cold water whenever possible – it helps keep the color longer. Though if you’re like me and prefer showers as hot as the sun, just go for it and know you’ll need to re-dye sooner OR just do what I usually do and watch to see what the color does. Always a fun adventure!
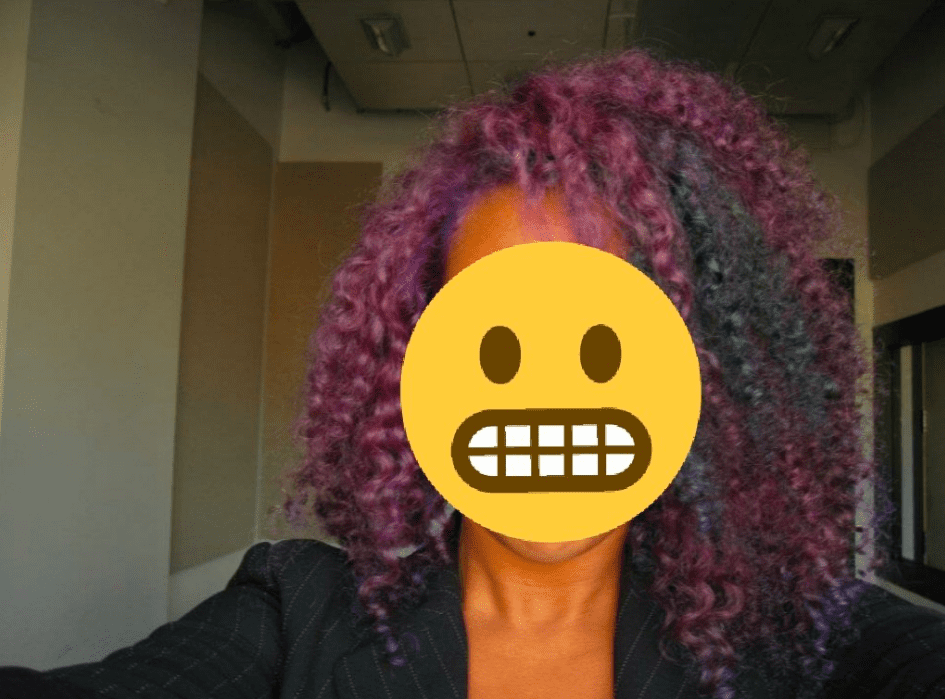
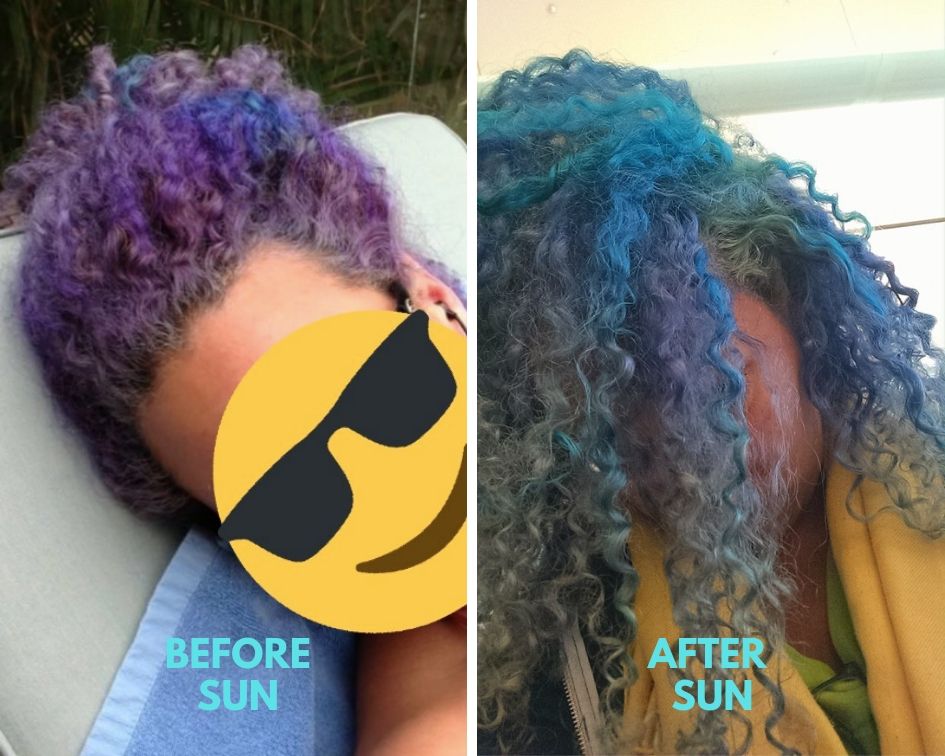
- Stay Out Of The Sun: Similar to the hot shower, if you’re looking to maintain your current color you’re going to have to hide your hair from extended sun exposure, vampire style. If you don’t heed this warning be prepared for some of this action:
And that’s how I bleach and dye my hair at home! I personally find it really fun and obviously it helps me look fly while sticking to my budget. Thank you for following along. And now – watch out because IT’S PURPLE TIME!
Have you ever bleached or dyed your hair at home? What are your favorite hair hacks?
I *always* wanted an ANTM make over! The British versions were not as striking nor dramatic (*disappointed sigh*). Then again, the girl with butt length virgin hair she’d had since she was born ALWAYS ended up with a platinum blonde pixie cut. We started to take bets on it in my family. That and on who’d cry.
Anyway, I loved this whole post. I now know what to do (and what not to do) for my dream purple ends! Thanks! 😉
Me TOO!! Good to know the British one isn’t as dramatic – I’ll skip it then. Y’all made bets on who would cry?! Wow that’s next level. Sounds like your viewings were much more fun than mine.
So glad you liked it! Happy to help others avoid my mistakes 🙂 and I’m excited to see your purple ends!!
Yeah, sometimes we’re just too stoic own damn good. Nobody ever had a fit or was taken to the hospital for dehydration and stress like they were in the US version.
Also, ‘Britain & Ireland’s next top model’ just didn’t roll off the tongue as nicely. Took them faaaarrrr too long to change the name.
We’d pick winners, argue who we thought was going to get through, have snacks and a a really a really loud ongoing commentary ( “Ohmagoodness, she’s amazing, how can she hold her breath that long?!”
“I cannot believe they dressed her as an elephant; They’re obviously calling her fat and she’s gonna cry.”) and cheer on ‘Mama’ Tyra to choose the right girl. It was a watching event in my household!
It’ll be a while before I do mine – hopefully after drastically reducing my lists of posts in my blog drafts? 😅 Hope you’re having fun at FinCon – this is a great calling card idea!
This running commentary sounds like something you could pay to release (in case you were looking for a side hustle) 😉 – you have your first customer right here! Sounds fascinating. As for blog drafts, good luck! I’m not even going to attempt that personally – 121 drafts and counting… And thank you!
I admit I’d probably be one crying if I got a hairstyle I couldn’t identify with. You’d feel it would be different with models or model wannabes because they are “pretty,” but if you don’t feel good about how you look, especially with your face (and I’m sure models are not insecure AT ALL-lol), then you tend to hide behind your hair and one thing to throw that all off is really hard to get used to. I admire people who can just go with anything! It turned out great and wish I was there to meet you at Fincon!
That’s a really good point and important for me to hear. In my mind being a model is partially about being a canvas for clothes ‘art’ so in my head changing your appearance and being ok with basically anything is a part of that, nothing to do with being pretty really. Good thing for me to think about though so thank you. And yes I wish you were on the other side of the plane I’m boarding now! Maybe next time 🙂
This is everything I have needed all in one handy resource, I can’t thank you enough. I just spent more money on a professional, and she’s great but I felt nauseous at the amount it cost afterward and know it’s not a budget item I can justify, no matter how much money I have. I started doing it from home years ago and have the exact same attitude about hair, “it’s just hair”! That said, I am entering a new career in education shortly so am holding off on the vibrant colour until I land the job. Either that or I’ll cave and make sure I’m really memorable during my practicum 😉 Thanks again, look forward to meeting you in person one day!
YAY – so happy it was helpful! This is definitely the longest, most in depth post I’ve ever done so hearing it might help you is making my day! Ugh I’m sorry the professional cost made you nauseous – it definitely made me nauseous too. Smart on holding off on vibrant color until you land the job – I do the same usually, but at my first interview with my current company they started with “I thought you had purple hair…” that’s how I knew I was in the right place 😉 . If you cave it won’t be the worse thing in the world and will definitely make you memorable!! Excited to see how it looks and looking forward to meeting you IRL!
Gosh, I was almost going to say this might be a post I had nothing to comment on, but then I was thinking about how a few years ago I started cutting my own hair, and the attitude that it’s only hair and will grow back is the perfect thing people need to tell themselves before trying this stuff! For a guy, it’s honestly not that hard, and the look of surprise I get from women when I tell them I cut it myself is hilarious.
I might have to post on my own haircutting some time. Basically I use my old 1970s Wahl razor to cut the sides and back, and use my fingers as a guide with my scissors (hair cutting quality scissors) to trim the top. I use my finger tips for the corners, and boom. Haircut done. And if you miss a spot, no problem – pull out the scissors and cut it again!
For me it wasn’t the money (well, maybe a little) but more that I really hate the whole haircutting process, and around here it usually comes out bad anyway. Plus the whole appointment thing – ugh! Plus, no matter what I tell them, I get the same haircut. Cutting my own hair is just so much easier.
Haha for someone who doesn’t think they have a lot to say – you have a lot to say and I love it 🙂 . You should DEFINITELY do a post or video about your hair – I think that would be really helpful to people, my partner included! Also this line is fascinating “Plus, no matter what I tell them, I get the same haircut” – even if you go to different barbers?!
Haha – it’s true! Wisconsin only has beauty schools, or at least did for a while (there was a movement to bring back barber schools in the state, not sure if it went through), so actual barbers were a dying breed (when I lived in a small city to the south of where I live I used to go to a barber who was almost 90!). So most beauty school gals get a tiny amount of instruction in cutting men’s hair. No matter what I would tell them, I would get the exact same haircut. And if I said, oh just cut it how you think it will look best, knowing they will cut it the same no matter what, that always threw them for a loop. I might have to save that for a future post. I cut my hair really short this weekend to give it a reset, but when it grows out I can show my usual technique. It’s funny when I tell women I cut it myself. They always say “what, really?” and then start examining my head haha
Wow, that’s a lot of work. Looks great!
Thanks so much! Definitely a lot of work, but also definitely worth the cost savings (and it’s relatively cheap entertainment 😉 )!
I just wanted to thank you for the suggestion of using coconut oil as a “hack” for conditioning my highlighted hair. I tried it the other night (for about 15 minutes before showering – not a whole day) and I think it helped.
YAY – I’m so happy it seemed to help!! It’s been a real life saver for me – my hair is not at all the straw-feeling mess it was when I used to bleach it.
Saw this and thought of you: https://overtone.co/
Their products look pretty cool!
Interesting! Thank you for sharing. I checked out their purple for brown hair and it actually costs the same as all the stuff I bought to do my hair and it looks like a lot less fun 😉 . Awesome option for people that don’t like to bleach their hair though! I’ll tell them to check it out.
Just to comment on overtone…I have dark brown hair and used the OverTone purple for brown hair product… It did not come anywhere near the vibrancy of this. In fact, you couldn’t even tell I had used it unless the sun hit me *just* right.
Oh interesting – thank you for adding your experience!
Hi, Appreciate you documenting and providing step by step instructions to achieve your creative look! I do have a question. Was this a one day process? or did you let you hair rest for X amount of day between each process?
Thank you!
Hi Viviana – So glad you appreciated it! I did my last dye job in 1 day (1 bleaching and 1 toning), but if I am bleaching multiple times I do it over multiple days to give my hair time to rest. I’ve been told that the longer you wait to give your hair a second to recover the better. Good luck!
Thanks for the awesome article… very indepth. I’m on round 2 of dark brown to blonde and I definitely will say dye your roots last! I ended up with. Blonde roots and brown ends… time to fix it so I have been googling for any tips.
So happy it was helpful! Good luck with your roots 🙂 .
Do you use the toner right after the bleach or do you wait in between as if you were bleaching a second time?
I personally don’t wait and tone right after the bleaching process is done.
Thank you for posting this! I have saved this for when I was brave enough to break out the bleach. I’ve dyed my own hair since I was 15 but never bleached at home.
Of course! Happy to share the knowledge and good luck!
Hi! This was so great and helpful!! I just have one question: you said you usually bleach more than once but in this you only bleached once and then used a toner, right? I bleached some of my hair and am wondering if I should bleach again and then tone, or if I should skip the second bleach. I also have thick dark brown hair! Currently it is looking strawberry blonde
Hi Vanessa! I’m so glad it was helpful 🙂 . And that’s correct – if I didn’t get the lift I wanted with the first bleach I would wait several weeks and then bleach it again and then tone it. Sometimes my hair was stubborn like that. However, if this is your first time bleaching your own hair I wouldn’t recommend a second bleaching personally. Also if your current color is similar to my pre-toning picture you should be good to go 🙂 . Good luck!
Hi!
Thank you so much for the step by step, it’s exactly what I was looking for.
I’m currently died a medium brown and want to dye it a medium grey. Although your disclaimer says you aren’t a professional 😉 I’d just like to ask if you think I *have* to tone?
Thanks again!
Hi Emma – Yay! I’m so happy it was helpful 🙂 . And yep – I’m definitely not a professional…BUT if you want grey hair from a medium brown I think you’re going to have to tone it. Grey is similar to the white hair I’ve been able to achieve in that it requires a lack of lingering red color from our brown hair. If you don’t tone it I think it will come out as a light blonde at best. Anyway, I’m curious what you decide and how it turns out – if you would let me know I would love to hear the update 🙂 .
I know you’ve had this up for a while, but I’m so glad I stumbled upon it a couple of weeks ago. Your step by step instructions, product suggestions and tips helped make coloring my teenage daughter’s dark brown hair to purple hair a success! Thank you so much!
Oh wow – I’m so happy to hear that!! Thank you for telling me 🙂 .
This article holds relevancy all the way in 2023 lol… I love your attitude and process because it was like reading what I would write out for people if I had bleached and dyed my hair a few times lol… This will be my first time bleaching at home. I love the ion products and manic panic. I never bleach but I do full coverage of red. I also use 2 boxes of dye and am I dangerous woman so I mix colors a lot. I sometimes find Revlon for $3 a box of their reds and mix 2 and do my hair. Last ion dye I used a red and pink. I want to do a vibrant but slightly (very slight) natural red on top and another color underneath for my hair (never done any color but red and it’s time). I do love the pigments from ion now, I’m not sure when they came out, but have you tried them? And I know you’re supposed to rinse the hair until the water runs clear but mine NEVER goes clear, even in cold. Am I doing something wrong?
Haha I’m so glad to hear that! Good luck bleaching at home – you’ve got this. And woah – you’re hardcore with with color mixing 🙂 . I haven’t tried ion pigments, but I did buy a purple one recently and am excited to see how it performs!
As for clear water, it takes FOREVER but my water has always eventually run clear – sometimes it just takes like 20 minutes 🙂 . How long have you tried rinsing it for? I doubt you’re doing anything wrong.
Hiiii. This gave me the push I needed to bleach and dye my own hair to save money! But, do you have any recommendations doing root touchups? I’ve done mine twice now but still struggle with it.
Hi! That’s so cool! I’ve never actually touched up my roots so I sadly don’t have any recommendations. I like to have it grow out to an ombre look. I watched a lot of people doing their hair at home to learn how to bleach and dye my hair originally though and there’s probably a lot of information on there about root touch ups in case that helps. Good luck!
Thank you so much! I used 30v developer with bleach and left in for the max time, and it took my hair from black-brown to a hay-colored blonde. I got the exact same toner and followed the instructions (mixing it 1:2 with developer) and it turned purple in my hair when I applied it, but my hair didn’t have nearly the change from blonde to white that your hair had. Did I do something wrong? I dyed my hair green after so the yellowness was not a problem, but I’d like to know for the future.
Hi! I doesn’t sound like you did anything wrong. Everyone’s hair reacts differently to bleach and toner. It also has to do with if your hair is ‘new growth’ or has been dyed before. At that time I believe my hair was new growth so it was easier to lighten it. The toner does look purple when you apply it to your hair so that’s normal.