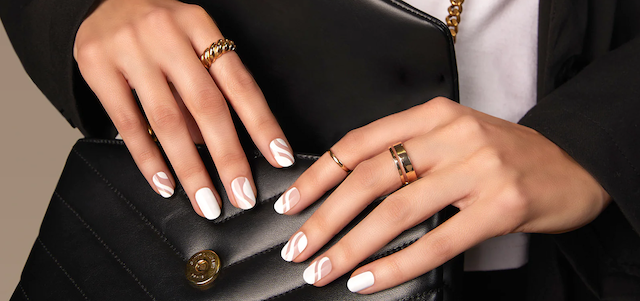
So I love having my nails painted. I feel fancy for some reason and I like it as an option for self-expression. However, the fact that I’m a full-time nomad and move every month, has made it challenging to always travel with the accoutrement I need to do my own nails.
Between airport liquid limits, exploding nail polish (yes – it’s happened to me…multiple times), and the possible challenge of finding specific items in other countries, I was looking for a better solution. I guess technically I could just get a manicure in every city I move to, but where’s the fun in that 😉 ? I’ve been enjoying my nail hobby and seeing how my skills have improved over time.
I was lamenting my (not at all serious) woes to a few friends and they told me about something that blew my mind: Nail Stickers. I hadn’t heard of these before (I guess I do live under a rock), and was initially skeptical. Stickers like what children play with? How would that ever look good? Would they give me the same fancy feeling I get from painting my nails?
I was curious and also intrigued because it sounded like this option would answer a lot of my concerns around my current nail travel packing list. I’ve been looking into more nomad friendly beauty options (which is how I stumbled upon my new beauty bar obsession detailed below), and this seemed like something else I should try to sate my curiosity.
- My Favorite Nomad Hack Of 2023: A Conditioner Bar
- Review: Ethique Shampoo, Conditioner and Lotion Bars
So I looked around, listened to friend’s recommendations, and settled on trying the “Gleam Queen” Dashing Diva Nail Strips, and while I waited for my package to arrive, I reflected on the things I don’t love about painting my nails. As I mentioned, I love the self-expression and how it somehow makes me feel fancy with some paint on my nails.
However, there are many things I don’t enjoy about nail painting. The first is that it takes forever 🙂 . It usually takes me a full length 2 hour movie to paint my nails because of the waiting between applying a base coast, two layers of paint and a top coat. And forget it if I decide to add glitter on top of it like the picture below 🙂 .
The other thing I dislike about doing my nails is that no matter how patient I am and the time I wait between coats, I inevitably mess up my nails in some way 🙂 . Be it an immediate chip, indent or rogue bubble in the paint, my nails are never perfect for more than an hour at a time. And I don’t like having a fear of using my hands in case I mess up my nails – that’s wild.
Another aspect of nail painting I don’t love is how long it takes to get off. Because of all the layers I like to use, it takes me a good hour to get everything off my nails and it’s a labor intensive process. Lastly, I’ve found that some polishes stain my nails if I’ve been out in the sun or in the pool a lot, which are my favorite places to be 🙂 .
So between the time suck, the inevitable flaws and the travel burdens, I was curious if these Dashing Diva Nail Stickers would help get rid of the things I don’t like about doing nails. Spoiler: Hell yeah they did 🙂 !
My Experience
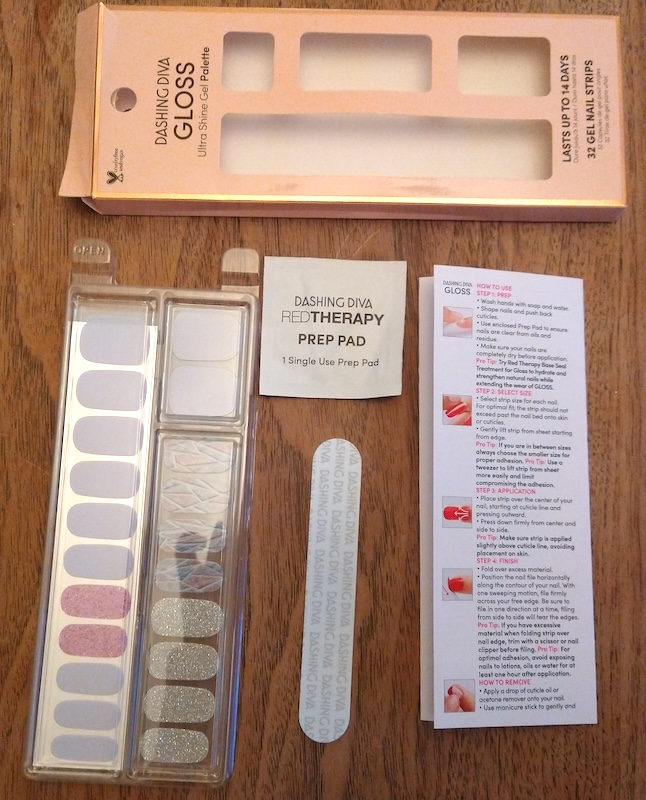
First, to be fair, Dashing Diva and other brands don’t call these products “Nail Stickers.” Maybe because it sounds a little juvenile. Instead they’re “Nail Strips” or “Nail Wraps” on their website. The type that I’ve been trying from Dashing Diva are from their “Gloss” line, which are nail stickers that don’t require a UV light like their gel nail stickers. They also have actual press on nails and other options that I’m not curious about at the moment. So I finally received my Gleam Queen Gloss Nail Strips, read the Dashing Diva FAQ and got ready for this new adventure!
Unboxing
First when opening the box, I was happily surprised to see that inside was a nail file and a small pad with nail remover on it. So travel friendly! There’s everything I need right in the package. This package also includes 32 stickers, so I was excited that I might be able to get more than one (10 finger) manicure out of it if the sizes of my nails match with their standards.
Application
Before I began I of course did some more research and watched this video of how to apply the nail strips:
These are the steps listed on the Dashing Diva instructions:
STEP 1: PREP
- Wash hands with soap and water
- Shape nails and push back cuticles (the latter of which I never did…)
- Use enclosed Prep Pad to ensure nails are clear from oils and residue
- Make sure your nails are completely dry before application
STEP 2: SELECT SIZE
- Select strip size for each nail. For optimal fit, the strip should not exceed past the nail bed onto the skin or cuticles
- Gently lift strip from sheet starting from the edge
- Pro Tip: If you are in between sizes always choose the smaller size for proper adhesion
- Pro Tip: Use a tweezer to lift strip from sheet more easily and limit compromising the adhesion (I haven’t tried this)
STEP 3: APPLICATION
- Place strip over the center of your nail, starting at cuticle line and pressing outward
- Press down firmly from the center and side to side
- Pro Tip: Make sure strip is applied slightly above cuticle line, avoiding placement on skin
STEP 4: FINISH
- Fold over excess material
- Position the nail file horizontally along the contour of your nail. With one sweeping motion, file firmly across your free edge. Be sure to file in one direction at a time, filing from side to side will tear the edges (I’m still working on this as you’ll see below)
- Pro Tip: If you have excessive material when folding strip over nail edge, trim with a scissor or nail clipper before filing (I haven’t tried this. I just started filing it)
- Pro Tip: For optimal adhesion, avoid exposing nails to lotions, oils or water for at least one hour after application
After a bit of trial and error and multiple experiences applying these nails, I’ve come up with some tips that have helped me apply them easier:
- To measure if a sticker will fit a specific nail, take the whole strip of nails and put the still wrapped sticker over your nail and round it over the whole nail to see if it fits side to side
- If you do apply a sticker that’s slightly too small for your nail, I prefer to make sure it is aligned with the side of the nail that I see most often (the ride side of the left hand and the left side of the right hand)
- If the above technique doesn’t work for some reason, it’s not a big deal to reposition a sticker after you’ve started putting it on your nail. Just peel it up and place it on another part of the nail. This was helpful for me specifically to make sure the sticker was straight and right above (not on) my cuticle. This also helps if a bubble forms while you’re applying the sticker
- If I missed a bubble in the sticker during application, I discovered that I could smooth it down with a nail from another finger
- I wrote down which sticker fit which of my fingers for easy reference next time
Shaping
Once the sticker is applied, it’s time to get rid of the excess and shape the end of the sticker. The video above shows filing down the stickers with the nail filer held vertically, but I found that difficult to do.
Instead I ended up filing side to side, which did make some little clingy bits on the end of the nails appear, but once I got the excess sticker off, that was easy to get rid of by filing vertically. Peeling instead of filing those bits takes off more than I intended so I didn’t do that after my first application. Maybe one day I’ll be able to file everything in the ‘correct’ position from the start, but that day is not today 🙂 .
Despite me not being as perfect as that marketing video, I found it surprisingly easy to file through the excess sticker and then shape the end of it. My process was to take one side of the end of the nail (left, center or right), fold it over the end of my nail and then file that excess off, and when it was fully separated and hanging from my nail, I would move to the adjacent part until all the excess fell onto the table.
Done!
My nails were done and they looked stunning. To summarize my thoughts:
When I was done applying these stickers I was really shocked that I could just go about my day regularly. I didn’t have to be careful to not touch anything for hours like I do with polish. There was also no moment of immediately chipping my nails and feeling like I just ruined hours of hard work. I just went on with my life – and that’s exactly what I wanted 🙂 .
I kept admiring my nails because they were so much nicer than what I could ever do with polish and even asked my Partner what he thought…and he didn’t realize it was a sticker 🙂 . SCORE!
The Dashing Diva packaging says to not submerge your hands in water (basically do the dishes) or expose your nails to a lot of oil (because of the adhesive). So I followed that advice and after an hour, I did the dishes, which is something that would usually result in messing up the manicure I just spent so long on, but NOT THIS TIME! This seemed like the ultimate test to me and these stickers passed with flying colors.
Adding A Top Coat
Now here I’m going off script. Dashing Diva’s instructions don’t say anything about adding a top coat, but I was curious to try it for a few reasons. One is that I enjoy the extra shine of a top coat, the other is that it makes my nails feel thicker, which I also enjoy. And lastly it’s because nail sticker lovers on the net mentioned it might help them last longer.
However, other people online didn’t recommend it and said that it shrunk their nail stickers. So I decided to wait at least a day and see how my nails were doing before applying this Sally Hansen Top Coat.
The next day I applied my top coat, it dried instantly and I paid close attention for the next two weeks and didn’t see any shrinking. So adding a top coat is currently part of my nail sticker process, but likely won’t be for long since it’s just another liquid for me to carry around the world 🙂 .
Removing Without Acetone
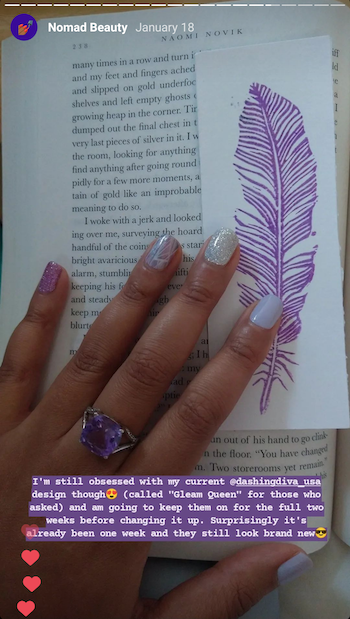
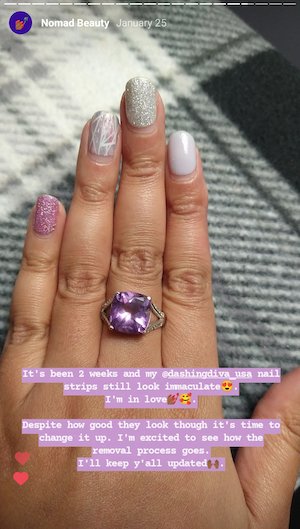
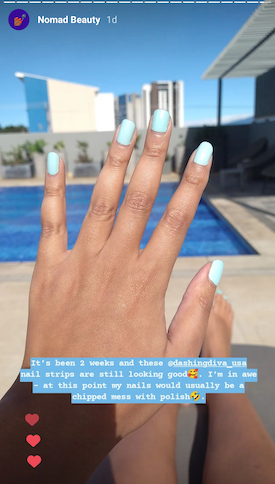
It’s been 2 weeks so it’s time to remove those nail stickers. At this point in my first application, my nails still looked immaculate (see below) and the only change I saw was that my nails had understandably grown out a little so I could see the bottom of my nails.
After my second application of strips, I noticed that after two weeks the very tops of my nails weren’t all covered by the sticker anymore. I’m not sure if that’s because I had used my hands a lot more during those two weeks while moving across the world or if it was because I had used all Gloss Color stickers (see below) instead of ones with designs.
Anyway, I’ll discuss the differences I observed between those two types in a section below. Overall though I was shocked with how good they looked after 2 weeks. It was nothing like nail polish – the design ones especially looked exactly as they did the day I applied them.
So one of the reasons I was most interested in nail strips was the lack of nail polish remover. It’s not required to remove these nails. Here are the removal instructions from Dashing Diva:
HOW TO REMOVE
- Apply a drop of cuticle oil or acetone remover onto your nail
- Use manicure stick to gently and slowly lift the nail strip from the corner of the cuticle area. Gradually roll the strip off your nail
- Caution: Do not peel off with force or in one quick motion
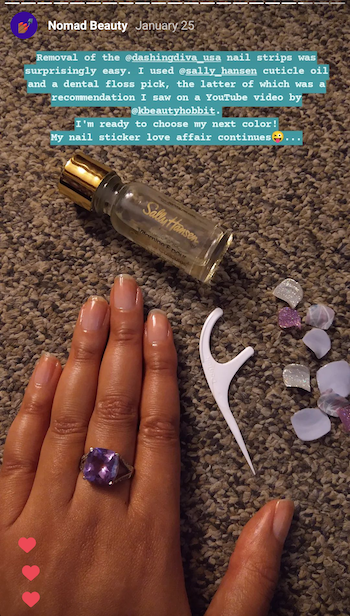
However, I of course couldn’t just do what they said 🙂 . Instead I scoured the internet to see how the nail sticker greats do it. That’s how I discovered a hack that makes removing these nails with oil even easier: a dental floss pick 🙂 .
Here’s a nail great showing how it’s done:
Genius! So I quickly got my hands on a this dental floss pick and this cuticle oil and got to removing. Here is my process:
- I start by putting oil at the base of all of my nails near the cuticle so they can all start dissolving the adhesive while I work on other nails
- I then rotate between nails, slowing pushing my floss pick under the nail sticker and rolling it off my nail
- When I meet resistance I move to the next nail and when I’m done with a hand I re-apply oil to all of those fingers so that can work on the adhesive while I focus on the other hand
This is what I found to be the most effective system after multiple removals. The first time it took me awhile to get all the nails off, but I was going super slowly and being really cautious to not rush or damage my nail. The second time was faster – I better understood how much pressure my nail could take. Either way, it was faster than taking off nail polish and way less strenuous. Instead of rubbing my nails nonstop for an hour this is mostly waiting for adhesive to dissolve.
The other thing I was curious about is if this cuticle oil system would take off my top coat since I assumed that would require nail polish remover – nope! Just using the oil took off my nail stickers and my top coat (including top coat I accidentally got on my naked nail 🙂 ).
A bonus of cuticle oil is its original purpose – to nourish cuticles and nails 🙂 . I have ridges on a few of my nails and my Mom commented that she got them as well as she got older. I did some light research and it does seem to be a normal part of aging. However, since I’ve started using the cuticle oil these ridges have seemed less noticeable overall and my nails seem stronger and healthier. Wins all around!
However, if you’re looking for options outside of oil and picks, the following is untested by me, but people on the Dashing Diva subreddit claim that if you don’t have cuticle oil, other types of oil such as olive oil would work. Another person said they soak their nails in warm water and a few drops of dish soap for 20 minutes and then are able to remove the nails that way without oil. I suspect I’ll be testing that theory after this cuticle oil runs out and will let y’all know what happens.
So after my cuticle oil + dental floss pick removal I waited a few days as suggested by the Dashing Diva FAQ and then applied by next set of stickers!
Color VS Design Strips
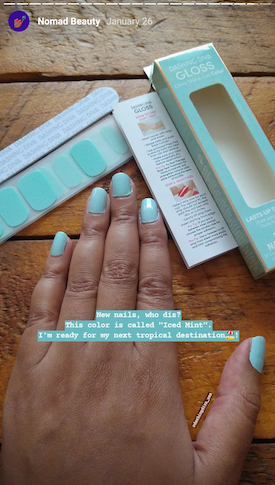
I mentioned this briefly above, but my first application of these nail stickers were the Gleam Queen Design Stickers and the second were the Iced Mint Color Stickers. I discovered that there are some differences between the solid color Dashing Diva nail strips and the ones with designs and wanted to chat about them here.
So there are several types of Dashing Diva Gloss nail strips. The main types are Gloss Color and Gloss Design. The Color strips are a solid color (who could have guessed 😉 ) like my Iced Mint nails below. And Design nail strips are the ones with designs like my Gleam Queen manicure. The Color strips have 27 nails stickers in them (or ideally 2 manicures) and the Design strips have 32 (ideally 3 manicures).
The main thing I noticed that was different between the Color and Design strips is their thickness. The Color strips are thinner, which I guess makes sense because the Design ones have paintings on them and glitter and other thick substances. However, as a result of the relative thinness of the Color strips, I was able to see the ridges that some of my nails have through the strips, which I wasn’t able to see through the thicker Design strips. Adding my top coat did help make the ridges less obvious, but that was something I noticed.
The other thing I noticed was that the Color strips seemed to bunch up more when I was applying them, which I think is also related to their thin nature. However, I was able to smooth out the nail and on one bump that I missed, I was able to smooth it out after I added a top coat that dried, which I didn’t expect to work – I was just experimenting 🙂 . Overall the Design strips seem more forgiving in the first place.
Another thing I noticed might not be a Color vs Design thing, but it only happened on my Color manicure. When 2 weeks was up with my Design manicure, my nails looked the same – they had grown out a little, but that was it. However, after 2 weeks with my Color manicure, I noticed that the very tips of my nails were no longer under the sticker.
Now this could be a result of many things. For one, people on the Dashing Diva subreddit mentioned that when they use certain top coats, it shrinks their nail stickers. I hadn’t had that happen at all with my Design manicure, but it’s possible the thinner Color manicure was susceptible to it.
The other possibility is that I caused it with a more active lifestyle. While having the Color manicure, I moved from NY to Costa Rica and obviously used my hands a lot with packing, unpacking, dishwashing, cooking, swimming etc.
So this might not be a difference in these types of nails, but it’s something I wanted to make you aware of. Luckily it was basically invisible to anyone but me (who was looking at my nails an inch from my eyeballs 🙂 ) and it only appeared when I was going to change my nails after 2 weeks anyway. I’m going to see what happens with my next set of Color strips and keep y’all updated via my Insta Stories as always.
Additional Purchases
After all of that excitement, I might have gone a bit overboard and ‘accidentally’ bought a lot more nail strips:

Here’s what I got (from left to right – top row first):
- Deck The Halls
- Jolly Good Fun
- Rose All Day
- Mistletoe Kiss
- Santa Baby
- Iced Mint
- Taste The Rainbow
- All Out Diva
As you can tell, I was particularly interested in the seasonal designs because that is something that I would never be able to do myself. My nails are going to be on point for the winter holidays 🙂 .
Nail Strips VS Nail Polish
So what’s the verdict? Let’s do a pro/con list for nail strips:
Pros
- Faster application
- Faster removal
- Less liquids required (better for travel)
- Longer lasting
- No sun staining
- DIY Advanced designs (that I could never do myself with paint)
Cons
- Slightly more expensive ($7-8 for one package of Dashing Diva nail strips vs $5+ for a bottle of nail polish)
So basically nail strips win in every category except cost. One package of Dashing Diva is usually $7-8 (or $5-6 on sale), which is obviously more than a whole bottle of nail polish. Though a package does contain enough stickers for up to 3 manicures depending on your nail sizes, but a nail polish bottle would provide more than that for a similar cost.
But here’s the thing: money is not my only consideration 🙂 and all those pros are definitely worth the extra price to me – especially when compared to an actual salon manicure, which is the only way I would be able to get nails this beautiful without nail strips.
So overall, the pros far outweigh the cons for me. A little more money for way less work and a prettier, longer lasting and more nomad friendly manicure is a perfectly acceptable exchange to me.
Conclusion
So that was my experience with Dashing Diva Gloss Nail Strips! I was really surprised to discover that this product exists and happy to have it as a great new addition to my nomad luggage. I’m excited to try the other Gloss patterns I already ordered from Dashing Diva and to see what new designs they come up with. I’ve also learned to not immediately jump to conclusions about things I’m not familiar with (“Stickers? Like for children?!?”). Lesson learned 😉 .
What’s your favorite beauty product lately?
Love it! I’m going to try the nail stickers.
Cool!
How do you find them comparatively in terms of drying your nails out? I always find that’s an issue with polish even with “moisturizing” base coats
I haven’t found that stickers dry out my nails at all. Using nail polish remover to remove polish all the time dried them out so much I had to take long breaks for them to heal, but since I don’t use acetone to remove the stickers and use oil to do that instead my nails are healthier than ever. I think I’ll use the oil even when I’m not using nail stickers because it seems to be making my nails healthier as a lovely side effect.
Hey Purple, thanks for posting as per usual. Not as relatable to me but glad to see you posting consistently
No worries – thanks for being here.
Thanks for posting! I started using these last year and love them too. I still end up ruining mine eventually from rock climbing or from work, but it lasts WAY longer than regular polish. Thanks for giving me some extra tips on wear and removal!
I also started using press on nails as well for colours/designs I like repeating, so I don’t have to keep buying a new set all the time like the stickers.
That’s awesome! Happy to help. And good to know about the press ons – I didn’t know they were reusable! Very cool and good to know in case I want to dip my toe into that pool 🙂 .
My teen daughter and I tried these recently on a whim when we found a Christmas-themed set at TJ Maxx for $4.99. One set was enough for both of us to have festive nails for the holidays. After 2 weeks, they still look pretty good, just a bit of wear on my nail tips and the expected growing out at the base.
$4.99 at TJ Maxx? That’s awesome! I’ve been buying them directly from Dashing Diva for $9 (or $6/7 on sale). That’s amazing they have theme nails at that store and I’m happy to hear they still look good after the allocated 2 weeks. Thank you for sharing 🙂 .
Interesting. I tried that brand and didn’t like it as much as some other gel strips, Polish Pops. Available online only. They do require a UV lamp for curing but it’s very small (part of their start up kit) and wash for travel. There is a Facebook group, Polish Pops VIPs, with lots of tips and support, as well as one for swapping or purchasing partial sets from others, Polish Pops B/S/T.
Interesting. I’m not currently interested in strips that require a UV lamp since I travel full-time, but that’s all good to know.
I generally read your blog for the FIRE content, but I’m so glad I read this post!
I was wondering what to do with my nails for my destination wedding, and these nails stickers were the answer 🎉
I got two sets, one to test beforehand and one with pretty designs for the wedding, and I was so happy with my choice.
Your tips on how to remove them (cuticle oil + dental floss) were really useful, although I might have damaged my nails a bit due to my impatience…
The second set is still going strong after a week and a half of applying it,
btw 💪
Thanks so much for doing such a detailed review!
Oh YAY!!! I’m so happy to hear they were a good solution for you. And yeah – removal is a process that takes a fair bit of patience. However, if you prefer a faster process I’ve heard that nail YouTubers use nail polish remover to get off stickers more quickly. I’m still using the cuticle oil, but have started using wooden cuticle sticks instead of the dental floss picks – they seem to get even more of the adhesive off. I hope your nails grow out/heal quickly and that you keep enjoying the stickers 🙂 .